These are my notes for the Rosa route of the Final Fantasy IV Any% No64 speedrun. While I am very familiar with the game and the speedrun, some of my strategies do not match those used by the world record runs, so there may be faster ways to do things. That said, I do periodically update this document as new techniques and strategies are discovered.
This particular guide is intended for high-level PB attempts. Beginners may wish to use the marathon guide instead, as it provides extra elixirs, but otherwise, the differences are minimal (and the marathon guide is less frequently updated, so it may be missing some helpful commentary). Runners using this guide may have trouble competing for the world record time, but times of 3:05 or better are definitely possible. I use this guide for my own PB attempts.
The reader should be careful about prematurely blaming RNG for their times. While there is a substantial RNG component at high levels, until you are able to consistently get times of 3:09 or better, I wouldn't worry about RNG at all. However, it is true that at times closer to the world record, back attack luck and battle RNG can be substantial contributors. I estimate an approximate overally swing of five minutes or so. Some of this can be mitigated by learning how to mitigate RNG in various fights, but certain fights (Octomamm, for instance) remaing problematic. Back attack manipulation may help with back attacks and surprise attacks, but there is at this time no real documentation of the technique and its limitations.
For the curious, the following is a short list of differences between this guide and what are generally considered world-record strats:
There may be additional differences, but these are the ones I can think of at this time.
While these are largely my personal notes used when I actually run the game, a number of people have been using them to learn the run, so I will briefly go over some of the more general concepts that apply to the run.
As I write this, there are several potential routes you may choose to run this category. These routes mostly only differ in the final third of the game, so the first two-thirds are roughly the same in any case. Here is a brief summary:
There are other routes, but they are older and obsolete. My personal recommendation is to begin with the marathon-safe version of the Rosa route. You may also choose to begin with Edge+Excalbur to get a few runs under your belt if you prefer Edge, and then to move on to Rosa once your time is approaching 3:10 or less. Once you've reached that level, you will be relying on good RNG for your better runs, and you won't want to be leaving two and a half free minutes on the table. That said, with enough luck, a 3:04:xx Edge+Excalbur time is entirely possible, if you're inclined to try grinding it out.
Unfortunately, as it turns out, levels matter a lot in this run. As such, there is a lot of research into the best ways to allocate experience throughout the run. Experience is primarily manipulated using the following facts:
The "perfect" path is a matter of personal preference and is always up for debate. I make my recommendations throughout this guide, but there are many ways to skin a cat, and you're welcome to develop your own path that suits your playing style better. However, keep in mind the following points:
In these notes, I recommend a particular experience path. However, it isn't necessary to follow it exactly, so long as the above goals are maintained. Consult some of the other guides (especially riversmccown's guide) for more information on other possibilities.
There are two primary methods of item duplication. One, used within the spoils screen after battle or after opening a chest with a full inventory, is used to duplicate consumables and is unused in this run.
The other is used to duplicate weapons and shields and is used several times. There are two variants: a single duplication (which results in two of the target item) and a full duplication (which primarily results in 256 of the target item). Regardless of which you are using, the technique starts out the same:
If performing a single duplication, you are done with the in-battle portion. If performing a full duplication, continue with the following steps:
At this point, you have pressed A a total of either two or four times (depending on which dupe). The rest of the duplication takes place out of battle. Keep in mind this is a basic description and you may see some runners do more advanced techniques at times. To complete the dupe, perform the following steps out of battle:
In order to hopefully prevent some common points of confusion, keep the following points in mind:
An incredibly important technique for the speedrun is something called "run buffering" or "'can't run' buffering". When attempting to run from a fight that cannot be run from (such as a boss fight), the game displays a dialog box that informs the player of their inability to run (hence the name of the technique). While this dialog is displayed, the ATB does not advance, but the player may input commands.
To properly execute a run buffer, once a character's menu has begun to open, hold L and R to attempt to run. Do note that the required timing on these buffers varies throughout the run. (Some of them have very strict required timing while others are more lenient.) For some of the more difficult buffers, common techniques are musical cues or to listen for the menu chime.
In addition, on occasion, you may need to buffer out of a command. In other words, after selecting and confirming the target of a command, quickly hold L and R. This technique is used infrequently, but is important when it is.
Going along with run buffering is something called pause buffering. This technique allows one to guarantee perfect run buffer timing. This is mostly for consistency, and at this time, I think I'm the only runner who consistently uses it.
To execute a pause buffer, wait until the target character's turn is approaching. (In other words, wait until you've confirmed the previous character's action or until a preceding animation has finished.) At this point, pause the game. You are looking for the target character to begin flashing. If they have not after a second or two, quickly unpause and repause the game. This will allow one ATB tick to pass. Again, check for the target character to flash. Repeat the process as necessary until they are flashing. At this point, you should hold down L and R, and then press Start to unpause. The run buffer will immediately take effect as the character's menu pops up.
Another important aspect of any No64 run is inventory management. You end up with a very full inventory and optimizing the location of items in the inventory is essential to a good run. This guide makes some recommendations, but ultimately, you will need to come up with an inventory management scheme you're comfortable with.
You have the option of using the Mimic Glitch (AKA Carrot/TrashCan) to defeat Milon and/or Milon Z. Learning these is beyond the scope of this guide, but it may be useful to know that you only need to pick up the Carrot or move the TrashCan to the top of the inventory if you intend to utilize these strategies. Keep in mind that this glitch is only possible on the original USA revision (sometimes called 1.0). The glitch was fixed in Rev 1 (sometimes called 1.1).
This guide makes the assumption that you are following along from start to finish. Menuing instructions assume that your characters are already equipped as per the guide, and won't list equipment that is staying the same. If you attempt to join in the middle, you may miss this or similar points.
This guide is primarily meant to serve as my notes for personal best attempts. As such, they generally tend to err on the side of less safety. In some cases, notes are made regarding potential safer strats for beginners, but they may not be entirely consistent throughout the document (especially regarding inventory management).
This guide uses the following conventions:
The following resources should prove invaluable to either help during a run or to help you learn the run in the first place:
This guide is intended to be used with a step route. The step route is not required, but it will generally save you 2 or 3 minutes if executed properly. For this guide, you can use either the no64-rosa or no64-rosa-safe routes, but be sure to know the differences. First, the safe variant gives you the option of using the healing pot in the Castle of Dwarves (not recommended, but if using the safe routes and you skip it, make sure to take the steps anyway). Second, the safe variant picks up two extra elixirs in the Pass to Bab-il. These aren't strictly required, but will allow you to use the safer Zeromus strat in all cases. The choice is yours.
Begin the game. During the introduction, you may wish to hold down B+Right+Down immediately before the battle with the Raven, in an attempt to avoid the Raven's attack. This is known as the BRD or BIRD skip. It may or may not work for you, depending on the awesomeness of your mashing. Finish the introduction and gain control.
If you're on seed 92, be sure to take at least one extra step before you finish the introduction sequence.
Pick up the Tent (the rightmost chest) on Castle Baron 1F and then head to Cecil's room in the left tower to finish the introduction.
Walk to the chocobo forest, optionally pick up the Carrot, capture a yellow chocobo, and ride to the Misty Cave.
Walk through the cave until you reach the boss.
D.Mist turns to mist.
Continue with Fight and Jump until D.Mist falls. There is a small chance (just under 1%) of a third cycle, depending on damage rolls.
After the battle, exit the cave and head toward Mist. While moving right as you approach the last tile before the town, hold left, and then hold X. The menu should open immediately after you turn around, but before you move any further. When the menu opens, release the buttons, and then use the Tent. After the night is over, and Cecil lowers his arm, begin to hold right, and almost immediately after, begin to hold X (while continuing to hold right). Once the menu is open, you can release the buttons.
If you are interested in manipulating your seed on a soft reset, this is what I consider the best time to do so. After using the Tent, find a consistent time to start a timer. I use the fifth note of the Tent song. Begin your rightward movement at your target time.
The hard part, of course, is determining your target time. This will require you to be very consistent in your mashing or to be using turbo. In addition, you will need to be close to frame perfect in your walking (including opening the door, getting the Tent, talking to the lady near Cecil's bedroom, getting the Carrot, and getting and riding the Chocobo). The closer you are to perfect in these, the more consistent your ability to target your seed on the soft reset. For reference, when using turbo, I begin my rightward walk at approximately 10.6 seconds on the timer. This fairly consistently puts me in the 40s. On non-turbo, the range is much wider (upwards of 80 frames), and I haven't figured out the ideal timing.
Walk past the village tiles, and then enter Mist from the right side. Head to the weapon shop.
Head to the northwest house, enter the fireplace, and pick up the Tiara from the first chest and Change (rod) from the chest at the end of the long passage. Exit the house and trigger the cut scene.
Attempt to rearrange your inventory during the animations. Change rows at the end for fist-pump swag strats.
If you are using a step route, this is when you need to start watching which steps you get encounters on.
Continue to Kaipo in the middle of the desert. Enter the town and trigger the cut scene.
NPC movement may seem random, but it's actually reasonably deterministic during this portion of the game. Assuming you walk perfectly and don't stand around, the NPCs will always be in the same location from run to run. This will remain true until Fabul. Learn where the NPCs will be and optimize your walking accordingly.
If at any point, you are unable to execute the Run Buffer for that turn, simply switch to holding A. This is entirely random. After the soldiers are dead, simply twiddle your thumbs until the Officer retreats.
Visit Rosa in the northeast house. Mash with B to avoid talking to Rosa repeatedly. Afterward, leave the house.
Just before exiting the town (immediately after emerging from the door in the wall), take one step to the right, and then go down.
Head north to the cave and enter the Watery Pass.
Walk through the first part of the cave, recruit Tellah, and then continue to the end of the cave. In the last room, pick up Darkness (sword) and exit the cave.
Enter the other cave and proceed until you meet Octomamm.
The following turn order assumes nothing goes particularly badly. Depending on how the battle actually flows, you may need to have Tellah revive Rydia with Life1 or cure the party with Cure2. Research suggests it is optimal for Tellah to stop himself on his third turn, but you can delay this if you need to cure. If Tellah gets any additional turns after casting Stop, it's easiest to just Parry.
I recommend holding Up+A starting on the black screen before the fight, so Cecil will enter the item menu immediately when his turn comes up.
At this point, just continue the pattern until Octomamm dies. Getting the two inventory management opportunities to happen correctly on Cecil's second and third turns requires good execution of the first few turns.
Immediately after the battle, open the menu.
Exit the cave and enter Damcyan. Head to the top of the castle, watch the scene, and then take the hovercraft to the Antlion cave.
Follow the path to the second room. You may take either the left or right path, but the right path feels better to me. Your mileage may vary. Once in the second room, pick up the chest on the right side with a Life.
Take the secret passage in the second room and make your way to Antlion's Nest and engage Antlion.
Depending on damage rolls, Cecil may be able to Fight on his last turn instead of Parrying. He can do anywhere from 0-70 damage, with a median value of 54. If you think Edward is likely to kill Antlion with his dagger or if you intend to Fight, this is a great time to have Cecil move Dreamer to the bottom of the inventory.
Walk out of the cave, board the hovercraft, and return to Kaipo, making sure to park directly to the left of the town.
Head to the house in the northeast corner of town and use the SandRuby on Rosa.
During the night, Edward will loudly play his harp and an angry monster who was just trying to sleep will attack.
You can simply hold the A button for the duration of the fight.
It's a common misconception that it's the Dancing (dagger) that makes this fight consistent. It's actually the fact that Edward is being placed in the middle slot, which offers a 25% accuracy bonus. Since the harp is a back row-compatible weapon in the American release, these factors combine to give him perfect accuracy. It also means Edward is back row-glitched, so even if you switch to the dagger, he retains his perfect accuracy. You may have seen a video of Edward and WaterHag trading misses. This is primarily a problem on the Japanese version or on the PlayStation version, where the harp is not back row-compatible, reducing Edward's accuracy substantially. In that case, you either want him in the front row or you can use the Dancing (dagger). Either way, it's irrelevant for this run.
After waking up, leave the town, making sure to take a step to the left immediately before exiting.
Take the hovercraft to the entrance of Mt.Hobs, parking directly to the left of the entrance.
Climb the mountain and meet Yang at the top.
During Yang's solo battle, you can potentially manipulate yourself out of a longer battle by checking the damage rolls against this chart and pausing for a short while if you get a bad first kick.
Once you have done 800 damage, you can stop attacking. At that point, heal or parry until Yang's turn.
Once you're down to one remaining Bomb, if anyone but Rosa dies, you may wish to use your Life (if you still have it) to revive them. Otherwise, send it to the bottom. In particular, Rydia needs this fight to reach level 19 before Dr.Lugae. (There are backups possible, but they aren't simple. You could kill two people at Milon Z., which makes TrashCan harder, or you could kill Rosa at Calbrena, or probably something else if you play with the calculator.)
After the battle, continue to the other side of the mountain. Continue downward and then head east to Fabul.
Head to the King's Room and offer to help. (Do not mash the B button during this dialogue.)
Now that Edward has reached level 10, he has an 82% chance of killing a Fighter with a simple Fight.
Walk to the Inn and watch the scenes.
Head down the stairs and make your way to the exit. After leaving Fabul, head for the ship to the east.
Walk east into Mysidia and go to the item shop on the right.
Head to the House of Wishes and talk to the elder. After the scene, head to the armor shop on the left side of town.
If you want additional safety during the Milon fights, you can also buy Gaea (armor).
Exit the town and head east to Mt.Ordeals.
If you are intending to use the Mimic (Carrot) strategy to defeat Milon, ensure that Porom gets hurt on the way up the mountain. This can be done either by an enemy (e.g. during a back attack) or by your own violent hands.
Palom will need to be able to kill Porom with one casting of Fire1 in the Milon battle. Unequipped, Palom can hit her for as low as 64 damage, so she should be at 64 or lower for safety. You have slightly more margin if you do the full equipment change, however.
Climb the mountain until you reach the summit.
Once on the summit, continue until you are even with the final bridge.
The following is a baseline list of things you might do in this menu. Please read the below paragraphs for more information. If using the mimic (Carrot) strategy, ideally, there is no menu at all.
If you are going to use the Mimic (Carrot) strategy, you should not equip or heal Porom, though you should make sure she is alive and in critical health. You can also opt to skip equipping the other characters, as well. You may wish to at least equip Change on Palom to make the backup strategy more effective.
The inventory management instructions will assume you didn't do any equipment changes.
Even if you're not doing the full equipment change, if you have to menu anyway to heal, you may want to put the Gaea (helm) on Tellah. It will have to be done eventually, and now's as good a time as any.
If you want an easier time if you're using the Mimic (Carrot) strategy, consider changing the battle speed to 2 (or slower).
If the twins cast Comet or if your Flare rolls are horrendous, Cecil should probably give up on attacking, and you should instead just expect to use Twin a third time. You can still try, though. Sometimes it works out.
If your Porom is at full health, you should probably just abort and click that Twin tab instead.
At this point, Milon should screech "Go, my children!" Cecil's next turn should arrive before Palom uses the Cure2.
This strategy is incredibly timing-sensitive. There are many ways it can go wrong, and the only way to really get good at this strategy is to practice it over and over. Porom's first run buffer has an incredibly short window, and in my experience, you must slightly anticipate it unless you have excellent reaction times. A relatively consistent method (if you're musically inclined) is to note that the proper time to run buffer is exactly four beats of the song after you confirm Fire1 (thanks to SwimmyLionni for telling me this).
Regarding the final sequence, once you queue Tellah's stop, Porom must queue her Cure2 before too many ticks pass, or Tellah will finish casting Stop before Cecil gets his menu. As a result, the buffers on Porom's turn are incredibly important. If Tellah beats Cecil, it most likely does not mean you were too fast with Tellah (unless you were plinking on Tellah's turn, then you might be too fast). It means you were too slow with Porom. If you delay Tellah's turn by a couple of seconds, on many patterns, this will result in Porom's turn being buffered for free by an invisible Milon turn. This is not guaranteed, however, so it's safer to simply go at a normal speed with Tellah and then rely on the pause buffer to get the run buffer in quickly. Regardless of how you do the opening buffer, the buffer after queueing the Cure2 is very important.
To execute the pause buffer, pause the game immediately after you queue Stop. Watch for Porom to flash. If she doesn't within a second or two, quickly unpause and repause once to pass an ATB tick. Repeat until she is flashing. At this point, hold down L and R and press start to unpause. This allows you to get the run buffer in as quickly as possible. This is only necessary on battle speed 1, and can also be omitted if you're confident on the run buffer timing. Do note, however, that there is an incredibly short window to get the first buffer of approximately six frames.
Finally, if you are too slow on Tellah's turn, Milon will get a chance to cast Lit-1 before the final Carrot toss. If you're particularly unlucky, this Lit-1 will strike and kill Palom. Great way to end a run, that.
Walk across the bridge and engage Milon Z.
Everyone should use Cure2 on Milon Z.
If Cecil still has Black equipped, you can have him Fight instead.
It's unlikely you'll need to heal, but if you do, you have plenty of Life or Cure2 potions.
The experience path assumes one character (specifically Porom) dies here. If you're close to finishing the battle and everyone is still alive, you may want to kill someone to keep your experience path intact (doesn't matter who). If only one or two survive, that's even better, but I wouldn't go out of your way to force it.
Hold Up and A starting from the black screen. If Milon attacks Cecil or Tellah, you can simply release up so Cecil attacks instead. Otherwise, release as soon as you hear Cecil's item menu trigger.
If Milon attacks here before Tellah's menu pops up, you will need to run buffer on Tellah's turn.
The experience path assumes one character dies here (specifically Porom). If you somehow get into a situation where two or three are dead, that's even better, but the only way that happens without the strat going badly is is if Milon Z snipes Cecil at the end.
After the battle, enter the tomb and watch the scene.
There is a very small chance you'll need a fifth dagger. Ideally, you'll kill him on the third, but that only happens about a third of the time.
After the scenes, descend the mountain and head to the chocobo forest. Catch a yellow chocobo and travel back to Mysidia.
Talk to the elder, and then head to Baron via the Serpent Road.
Go to the back of the Inn and talk to Yang.
If either Cecil or Palom are unable to kill their respective Guards, Tellah should cast Virus on all enemies.
If necessary, you can do limited inventory management during Karate's first attack.
It's actually possible to trigger the end of battle earlier than that message. There are essentially four different patterns, based on a timer you start right as the battle starts fading in from the black:
Originally, I tried using musical cues, but the problem is that the music doesn't restart for the second battle. These timings aren't perfect, but I haven't gotten around to improving them.
After the scenes, head to the Baron weapon and armor shop.
Enter the Old Water-way and continue until just before the Baigan battle on Castle Baron 1F.
Move on to challenge Baigan.
Your priority is to ensure Palom and Porom are dead. If necessary, Cecil can use his last turn to hit Yang again, but you will lose your chance to menu, so you'll need to finish anything in the Kainazzo battle. Don't leave Yang alive if you can avoid it.
If you are unable to kill Yang at Baigan, your experience path may become slightly more difficult. If Yang's HP are low enough that he'll die to Wave, just don't heal him and let him die at Kainazzo, and you should be okay. Refer to the Experience Route Calculator for more complicated scenarios (like twins that survived).
Head to the throne room to fight Kainazzo.
If Tellah rolls low here, have Cecil and Yang fight and then Tellah can cast Virus.
Do not mash X during the scenes, unless you're looking to mercy kill your run. In particular, once you're on the airship, pressing X at the wrong time will cause the game to lock up. Stick to A or B (or some other button) instead.
After the scenes, fly to Toroia and enter the castle. Visit Edward on the left side of the castle, use an Ether1 on Tellah and then cast Exit.
Head north to the Chocobo Village, catch a black chocobo, and fly to Cave Magnes.
Head through the cave until you reach the crystal room.
Talk to the Dark Elf. After the scene, talk to him again.
If you were unable to kill Yang during either of the Baigan or Kainazzo fights, please read the below information (you can ignore it otherwise and skip straight to the battle notes):
As it stands now, Kain will not reach level 19 before Valvalis and Rydia won't reach level 19 before Dr.Lugae. As you may recall, this is bad. During the upcoming Dark Elf fight, Dark Elf will cast Weak. Your mission is to kill whoever gets targeted.
If Dark Elf misses Weak, you're going to have to do the hard work yourself. Your best option is to have Tellah cast Virus on someone, probably himself (after he has cast Weak on the Dark Elf dragon form).
At this point, you'll need to make a decision based on Cecil's first damage roll. The default pattern is below, and we'll discuss the variations afterward:
If Cecil's first damage roll is 684 or less, Yang should Fight on his second turn instead of Parrying.
If Cecil's first damage roll is 942 or greater, Cid should Fight, Yang should fight on his second turn, and Cecil should Parry on his second turn. (The run buffer after Virus is not necessary in this scenario.)
After the battle, get the crystal and leave the room.
You may wish to heal Cecil, Tellah and Yang here to try to avoid menuing again before FlameDog. If you get back attacked on the way, however, you might have to menu again anyway.
Take the black chocobo back to the Chocobo Village, get a chocobo and return to Toroia.
Talk to the clerics and then cast Exit.
Board your airship and you'll fly to the Tower of Zot.
After Golbez is done taunting you, go up a floor and head to the chest with Fire.
If Yang dies to FlameDog, you'll either have to either resign yourself to a level 16 Yang at Dr.Lugae (which typically isn't the end of the world) or use the Life glitch to kill an extra blue doll at Calbrena (good luck getting favorable timing for that one).
Continue to the top of the tower, remembering to ensure Cecil and Tellah are fully healed before the battle.
Killing Yang is essential to ensuring a level 19 Kain with this experience path, but keeping Tellah alive is more important (for hopefully obvious reasons). Once Yang is dead, you can simply wait on Cecil's turn for the menuing opportunity. However, you must ensure Tellah is cured if the first Delta Attack hits him.
Enter the door, watch the scene, talk to Kain and then finally watch the next scene.
Kain should be level 19 at this time. If he (for whatever reason) is only level 18, after the first two jumps, have him alternate between Fight and Jump.
The timing on this fight is very sensitive. Don't hold A to fight unless directed to do so.
At this point, Valvalis transforms into her tornado form.
If the damage rolls were decent, Kain can Fight on his last turn instead of Jumping. If Valvalis still doesn't die, just continue the normal pattern. She won't have much HP left at this point.
If Cid dies, leave him dead, as it will help the experience path. Everyone else (except perhaps Cecil) optimally needs to survive. Being fully stoned counts as death, but it can be hard to see if this is the case or not.
If you want to ensure a level 19 Rydia for Dr.Lugae, make sure Cid dies here. Depending on your exact experience path, this may not be necessary, but it is if you are following this guide exactly.
After the scenes, leave the castle and take the airship to Agart.
Use Magma on the well. Afterward, fly to the Underworld.
Enter the castle and talk to the king.
If you have more than one blue and one orange doll remaining at this point, you need to do whatever it takes to eliminate the others. Often, you can change Yang's previous turn to Fight the doll that's hanging around, but this is a situation that you have to play by ear. Relying on Yang for anything here can be scary. In any case, only do the following once there are two dolls remaining.
If you accidentally trigger the big doll, immediately change rows, have Kain Jump, and have Cecil keep himself healed with Cure2 potions. If you're lucky, you won't trigger the damage range that results in the dolls splitting again. (It's based on damage, not on time.)
Try to make sure Kain is on the ground before queuing Mute, or it'll miss Kain. The mute status helps with the Dr.Lugae fight. Sometimes the timing of the fight doesn't make this easy.
If you are following my inventory management route, the following instructions will get everything set up for what's next. During each line of Golbez's speech, move one of the following items to the bottom: Headband, Karate, Silver, and Wind.
There are three different Silver items, for a total of six items.
During the first Demolish animation, equip Fire (sword) and move the single Dancing to 7L (next to Prisoner).
During the second, swap the stack of Dancing and Legend. Then swap Ether1 and Prisoner.
Finally, during the Mist attack, swap Gaea (helm) and Tiara and then swap Change (rod) and the stack of Dancing.
Your path through the Dwarf castle (especially regarding when to walk and when to cast Warp) may vary significantly depending on your step route. Your step route instructions supersede anything written here, but don't forget to cast Warp to get the crystal. In particular, it may ask you to cast Warp up to three times (in addition to the first warp). The priority order for these warps is 1) the Dwarf (axe) room on the way down, 2) the throne room and 3) the stairway in the right tower.
After the scenes, open the menu and cast Warp.
Get the crystal, and then walk down out of the crystal room. Leave the throne room, and go east to the shop area.
Head into the east tower and pick up Dwarf (axe) on the first floor and Strength (ring) and Elixir on the top floor.
Return to the shop area and go to the armor shop.
There has been some talk about giving the Strength (ring) to Yang instead of Kain if Yang is level 16. My experience and limited bot data suggests it doesn't really matter and may even be harmful to do so. I'd advise against it, but this note is left here in case you want to experiment.
Travel through the passage underneath the Castle to the Dwarf Base. If you are using the safe step route, make sure to walk up to the healing pot (though I don't recommend using it). Otherwise, skip it entirely. Exit to the Underworld, and then make your way to the Tower of Bab-il.
Enter the Tower of Bab-il and make your way to the CatClaw on 3F. Collect the chest and continue walking until just before Dr.Lugae.
Approach Dr.Lugae to begin the scene.
After Cecil targets Dr.Lugae the second time, you can basically hold A until the fight is over.
If for some reason Rosa is alive, have her cast Mute when her turn comes up. This just serves as a buffer, and doesn't do anything important.
This fight can vary slightly depending on if you revived Rosa or not. Ideally, she's dead. I'd remove the other instructions, but I guess they're useful if you accidentally revive her.
At this point, you can just hold A.
If Cecil gained a level during the Dr.Lugae battles (he does if you're following the experience route), it becomes absolutely imperative to equip the second CatClaw on Yang. Otherwise, you're going to have a bad time with random battles.
If equipped on Yang, remove the Strength (ring) at this time and put it on Kain.
After the battle, head to the Super Cannon. Enter the room and prepare to battle.
Watch the scenes, wipe your tears away, and make your way out of the Tower of Bab-il.
After the scene, fly to Baron and land next to the castle. Wait a fraction of a second, and then enter the castle. (If you don't wait, you will instead walk onto the castle tile without entering.)
Head to the right side of the castle and get Cid's lackeys to install the hook on your airship.
Fly north to Mt.Hobs, pick up the hovercraft, fly northwest to Eblan, and finally take the hovercraft west to the cave.
Make your way through the first room of the cave until you enter the "town". Enter the weapon and armor shop (second door from the right).
For now, the step route still has you walk to the armor vendor (even though the Ice (shield) has been removed). Future revisions of the step route will likely change this.
Continue through the cave until you meet up with Edge, making sure to pick up the two Elixir chests on the way if you are using the safe route. (When you return to the first room after the town after visiting the second, they are the two chests in the secret passage.)
Equipping Cecil here is primarily done to remove the Dwarf (axe), which would cause problems in the next boss battle if left equipped. Your step route may instead direct you to keep it on until just before Edge's parents instead. Either way, it must come off before that battle, unless you want to lose 10 seconds.
Head through the Tower of Bab-il until you reach Edge's parents. If you didn't remove Dwarf, do so now.
After this, your only task is to wait the battle out. You can use the animation and text box time for inventory management, but you will lose time by doing so. If necessary, you can also have Edge Dart any extra blades you have lying around, but that obviously wastes even more time.
If Cecil is level 19 (he shouldn't be unless the experience path went badly), have him equip the Dwarf (axe) again.
If Cecil is level 19, this strategy is not going to go very well. Refer to the level 19 strats from my Any% Glitchless guide instead.
At this point, Rubicant will cast Glare, most likely leaving one of your characters dead:
There are a few seeds that will want you to put the Dwarf (axe) back on immediately. Otherwise, you can wait until the next menu. That said, if you have the opportunity, it won't hurt to throw it on during the Rubicant battle. It's just that in almost all cases, it's not worth the the extra menu out-of-battle.
This is only worth doing if you are expecting perhaps three or more encounters before the Castle of Dwarves.
After the scenes, enter the crystal room and then proceed through the last few rooms of the tower.
Fly to the Castle of Dwarves and land to the left of the castle.
Enter the castle and visit Cid in the infirmary.
If you already put the Dwarf (axe) on Cecil, you obviously don't need to do it again.
Fly to the sealed cave, enter, and watch the scene.
Fly back to the Castle of Dwarves and go to the throne room. After the scene, cast Exit and fly to the Overworld.
Fly to Mysidia, land directly to the left of the town and watch the scene.
You step route may ask you to either walk or fly to the Big Whale. It seems silly to fly two tiles, but it can potentially save time.
Board the Big Whale and fly to the moon.
Fly to the Lunar Path and follow the path to the Lunar's Lair. After entering and recruiting FuSoYa, make the trek back to your airship and fly to Earth.
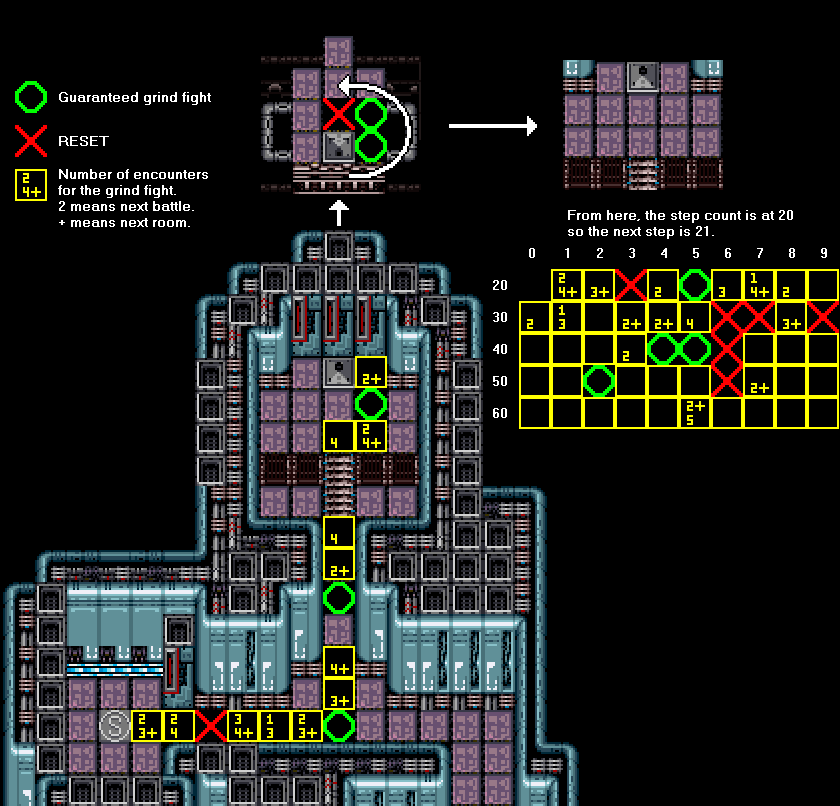
After watching the scenes, make your way through the Giant of Bab-il until you reach the Passage. You generally want to wait until immediately before the grind fight before you do this menu. If you're on a step route, this is easy. If not, you may want to menu immediately just in case you run into the grind fight on the way. However, back attacks from certain enemies will be more annoying in that case.
Next, move along until you find the grind fight. Use either a step route or this manipulation (image version) to find it.
This fight is somewhat complicated, so instead of a detailed command sequence, we'll instead look at the three phases of the fight. The first phase depends on exactly what type of battle you get:
Potential update: For the back attack/surprise formation, you may be able to avoid the Flood. Simply have Edge wait for the two Beam attacks, and then parry after the dialog goes away. Continue as normal from here with FuSoYa casting Quake. This remains experimental. It seems to work much of the time but seems more prone to failure. If you are using this method, you no longer need to check Edge's MP in the pre-battle menu.
If Edge is in the front row (in other words, in any case except a back attack), you might wish to have either Rydia, Rosa or Cecil use Change on their first turn. This will minimize the chance of killing the searcher early.
If you have a chance during a Beam attack, you should do some minor inventory management. If following my inventory management route, I recommend swapping Strength and Dwarf and then swapping IceBrand and Karate.
The following will need to repeat for five cycles (note that Edge does not get a turn for the first cycle):
This fight has very difficult timing, and things may go wrong. The most obvious failure is Rydia going before FuSoYa casts Weak. You can prevent this by delaying Rydia's Fight if the Searcher's text box pops up during her turn, but the exact timing of this is difficult to describe in text. Rivers McCown suggests no longer holding A on Rydia's turn after the second cycle. If Rydia does end up going before Weak, the character after FuSoYa should hold A the rest of the fight.
The battle speed 2 version of this fight appears to be 100% consistent, so using that is highly recommended.
A detailed strategy for recovery if things go wrong is beyond the scope of this guide.
Ultimately, you need to kill 17 dragons. Each Life use counts as an additional dragon kill.
After you have killed the requisite number of dragons, complete the following tasks:
There are only a few random formations that pose a potential problem for a post-grind Rosa, so Edge is revived to help with those if necessary.
Continue on to the Elements battle.
If someone unexpectedly died in a battle more than once up to this point, and Cecil survived, there is a strong risk that he will be on pace to reach level 28. You may wish to use the Experience Route Calculator to help determine for sure.
If Cecil is on pace for level 28, it's absolutely imperative to ensure he dies for the Elements battle. You can then revive him for the CPU battle if desired (though I can't imagine why).
At this point, not every turn is listed, but Cecil, Edge and Rydia should focus on making sure Cecil and Edge are dead. Afterward, Rydia can equip Change and then parry. If you get unlucky, Cecil will have to equip Dancing and take care of himself.
If FuSoYa somehow gets his final turn before Rosa gets hers, have him cast Ice-3 on Milon instead, and then Rosa can follow up immediately with a direct Cure4 (which will hit first).
The most annoying thing about this fight is that the pattern changes depending on how long everyone stays alive. You want to finish the fight with Cecil and Edge dead. It doesn't matter if Rydia survives or not, but if she survives, she'll ultimately be level 27 instead of level 26, which doesn't really affect anything.
With regard to FuSoYa's final turn, there is plenty of time to do what needs to be done with the inventory. As long as you enter the Black magic menu before White is finished, you're fine. Alternately, you can just try to finish everything during Rydia's turn.
If you're unable to get Change on Rydia by this point, you can either equip it later and accept that your inventory is not going to be quite right, or just do an extra menu to put it on before you dupe Gungnir.
After the scenes, board the Big Whale.
Sometime before Zeromus, you'll want to duplicate Kain's spear in a battle, ideally before you pick up any chests.
Enter the crystal room, and begin your descent into the Lunar Core. Along the way, you want to collect the chest with White (robe) in one of the rooms on B5. It's the lone chest in a room shaped like an upside down U.
If you are using a step route, you will potentially need to pick up one of the chests with a Ninja star. This guide does not require one in its Zeromus battle strategy, but the chest is in the step routes, as some other vrsions of the Zeromus fight do make use of one. There are three potential choices (Subterrane B6, Core B1 and Core B3), and the step route will tell you which to pick up. If not using a step route (or if the route is an older route and doesn't tell you), pick up the one on Core B3, as it has the shortest walk. If you don't need one for your Zeromus fight, however, don't bother picking it up, but still walk to the chest to stay on step route. (You may be able to skip doing so in the Core without affecting your step route much but be careful about shifting encounters between floors in that case.
Continue the descent until you reach the final battle. If you run into any formations of Red D. x1, it's probably faster to have Kain parry and for Rosa to cast Exit. The battle itself will take longer, but you'll escape the Heat Ray, which might make healing less necessary.
Approach Zemus to begin the final cutscenes.
The below strategy is very timing-sensitive. I recommend that you practice it several times. Be prepared to use a backup strategy (cast Bersk on Kain and have Rosa cast Cure4 after damage) if you notice Zeromus's actions no longer match the below list.
Practice counting the damage from Kain's attacks. The more accurately you can measure this total, the more likely you'll be able to choose the most optimal action on Kain's final turns. This guide assumes you are able to count Rosa's first White cast and at least five of Kain's attacks, but recommendations will be given if you are unable.
Zeromus transforms.
Zeromus shakes.
Depending on how that first sequence went, you may need to branch now. If you are using the safe route or if Edge, Cecil or Rydia was the Weak target, you can continue to follow the safe strategy. Otherwise, you must follow the backup strategy.
Zeromus casts Big Bang and shakes.
Zeromus casts Big Bang.
Zeromus shakes and casts Big Bang.
Kain's last actions can vary depending on the damage rolls in the fight. If you weren't able to count any damage, your best bet is to have Kain immediately use the Elixir, which will give you a 92.6% chance of success. Otherwise, use the below chart, which assumes you counted Rosa's first White and at least five of Kain's attacks:
| White + 5 Attacks | White + 8 Attacks | White + 12 Attacks | Kain Action |
|---|---|---|---|
| less than 19830 | less than 26606 | less than 36238 | Fight |
| greater than 19830 | greater than 26606 | greater than 36238 | Use Elixir |
If you run buffer Rydia's second Virus cast (even if Kain used an Elixir), there is a chance Rydia will get an opportunity to reflect a third virus. It may be worth taking if you're concerned about your damage rolls. Eventually, more specific guidance will be given here.
Zeromus casts Big Bang and shakes.
Zeromus casts Big Bang.
Zeromus shakes and casts Big Bang.
Kain's last actions can vary depending on the damage rolls in the fight. If you weren't able to count any damage, it's more or less a guessing game, but you're safest having Kain parry both turns, which will give you a 63% chance of success. Otherwise, use the below chart, which assumes you counted Rosa's White and at least five of Kain's attacks.
| White + 5 Attacks | White + 8 Attacks | White + 12 Attacks | Kain Actions |
|---|---|---|---|
| less than 20400 | less than 27300 | less than 36800 | Fight/Fight |
| 20400 to 22000 | 27300 to 28950 | 36800 to 38500 | Fight/Parry |
| greater than 22000 | greater than 28950 | greater than 38500 | Parry/Parry |
Ultimately, if you're able to count all 12 initial attacks, your odds of success go up to about 86%.