These are my notes for the Final Fantasy IV (USA) Any% Glitchless speedrun. While I am very familiar with the game and the speedrun, there are almost certainly faster ways to do things. That said, I do periodically update this document as new techniques and strategies are discovered, so if you follow them, you're probably not doomed to be perilously slow.
This particular guide is intended for high-level PB attempts. Since this category is less commonly played, this guide is probably the best available at this time. Nonetheless, it is not very well optimized in some parts. I use this guide for my own PB attempts.
While these are largely my personal notes used when I actually run the game, a number of people have been using them to learn the run, so I will briefly go over some of the more general concepts that apply to the run. However, the notes will almost certainly still assume you are generally familiar with some of the techniques used speedrunning the game (such as run buffering). If you are unfamiliar with these, there are other resources on this site that you may wish to examine.
Unfortunately, as it turns out, levels matter a lot in this run. As such, there is a lot of research into the best ways to allocate experience throughout the run. Experience is primarily manipulated using the following facts:
The "perfect" path is a matter of personal preference and is always up for debate. I make my recommendations throughout this guide, but there are many ways to skin a cat, and you're welcome to develop your own path that suits your playing style better. However, keep in mind the following points:
In these notes, I recommend a particular experience path. However, it isn't necessary to follow it exactly, so long as the above goals are maintained.
Another important aspect of any run is inventory management. You end up with a very full inventory and optimizing the location of items in the inventory is essential to a good run. This guide makes some recommendations, but ultimately, you will need to come up with an inventory management scheme you're comfortable with.
In defining a glitchless category, the obvious question becomes "What counts as a glitch?" This question is currently open to some debate, but a preliminary list of rules for the category is available here. If some of these rules are changed, this guide may be updated accordingly.
This guide makes the assumption that you are following along from start to finish. Menuing instructions assume that your characters are already equipped as per the guide, and won't list equipment that is staying the same. If you attempt to join in the middle, you may miss this or similar points.
This guide is primarily meant to serve as my notes for personal best attempts. As such, they generally tend to err on the side of less safety. In some cases, notes are made regarding potential safer strats for beginners, but they may not be entirely consistent throughout the document (especially regarding inventory management).
This guide uses the following conventions:
The following resources should prove invaluable to either help during a run or to help you learn the run in the first place:
This guide is intended to be used with a step route. The step route is not required, but it will generally save you 2 or 3 minutes if executed properly. For this guide, you should be using the glitchless routes.
Begin the game. During the introduction, you may wish to hold down B+Right+Down immediately before the battle with the Raven, in an attempt to avoid the Raven's attack. This is known as the BRD or BIRD skip. It may or may not work for you, depending on the awesomeness of your mashing. Finish the introduction and gain control.
It doesn't come up in categories that use the Mist Clip, but when you head south to the next room, be sure to step to the left as soon as possible unless you need to take extra steps. The tile immediately below the shield does not count as a step.
Head to Cecil's room in the left tower to finish the introduction.
Walk to the chocobo forest, capture a yellow chocobo, and ride to the Misty Cave.
Walk through the cave until you reach the boss.
D.Mist turns to mist.
Continue with Fight and Jump until D.Mist falls. There is a small chance (just under 1%) of a third cycle, depending on damage rolls.
After the battle, exit the cave and head toward Mist. Before entering the village, open the menu.
Enter the village and trigger the scene.
Attempt to rearrange your inventory during the animations. Change rows at the end for fist-pump swag strats.
Continue to Kaipo in the middle of the desert. Enter the town and trigger the cut scene.
NPC movement may seem random, but it's actually reasonably deterministic during this portion of the game. Assuming you walk perfectly and don't stand around, the NPCs will always be in the same location from run to run. This will remain true until Fabul. Learn where the NPCs will be and optimize your walking accordingly.
If at any point, you are unable to execute the Run Buffer for that turn, simply switch to holding A. This is entirely random. After the soldiers are dead, simply twiddle your thumbs until the Officer retreats.
Head to the shop on the east side of the building.
Visit Rosa in the northeast house. Mash with B to avoid talking to Rosa repeatedly. Afterward, leave the house.
Take the Ether1 from the northernmost pot to the left of the house below the one Rosa is in.
Just before exiting the town (immediately after emerging from the door in the wall), take one step to the right, and then go down.
Head north to the cave and enter the Watery Pass.
Walk through the first part of the cave and recruit Tellah. Sometime during the next two maps, you'll want to take an encounter:
You don't necessarily need this encounter in particular. The Pike x2, EvilShel x2 and Zombie x4 formations also appear to be acceptable. (For the Zombies, you'll want to have Tellah cast Cure2 instead.) The goal here is to get Rydia a few experience points.
On the way to the save room, you should collect the Ether1 in the middle of the map on Watery Pass-South B2F. Continue to the end of the cave, stopping to pick up the Darkness (sword) in the last room.
Enter the other cave and proceed. Pick up the Ether1 and Darkness (armor) from the two chests closest to Octomamm, before proceeding to the battle.
Rydia will almost certainly die quickly, and there's not much point wasting time reviving her until nearly the end of the fight. Typically, you can wait a round or two after Octomamm is down to one arm before doing so. If you get a lot of high damage rolls, maybe think about doing it earlier.
Immediately after the battle, open the menu.
Exit the cave and enter Damcyan. On 2F, collect the Tent, and then head to the top of the castle. Watch the scene, and then take the hovercraft to the Antlion cave.
Before entering the cave, use the Tent to heal and restore MP.
Follow the path to the second room. You may take either the left or right path, but the right path feels better to me. Your mileage may vary. Once in the second room, pick up the chest on the right side with a Life.
At some point, enter the nearby room and collect the Charm (harp) from the chest. (You can do this either before or after the Antlion fight. If you're using a step route, follow its guidance.) Either way, take the secret passage and make your way to Antlion's Nest to engage Antlion.
Cecil can continue using Fight. Edward should either Parry or use a Cure1 or Ether1 as necessary. You don't usually need to cure until after two Counter hits. Rydia can cast Chocb four times before you need to restore her MP with an Ether1. You won't need to do that more than once.
Walk out of the cave, board the hovercraft, and return to Kaipo, making sure to park directly to the left of the town.
Head to the house in the northeast corner of town and use the SandRuby on Rosa.
During the night, Edward will loudly play his harp and an angry monster who was just trying to sleep will attack.
You can simply hold the A button for the duration of the fight. Despite popular myths, Edward will not miss with this setup, even using the harp.
After waking up, leave the town, making sure to take a step to the left immediately before exiting.
Take the hovercraft to the entrance of Mt.Hobs, parking directly to the left of the entrance.
Climb the mountain and meet Yang at the top.
During Yang's solo battle, you can potentially manipulate yourself out of a longer battle by checking the damage rolls against this chart and pausing for a short while if you get a bad first kick.
Repeat this rough pattern until you have done 800 damage. At that point, heal or parry until Yang's turn.
I haven't yet figured out the best approach for the second half of the fight. You can experiment with having Edward or Rosa cure instead, though it usually only matters if you want everyone to survive. If Rydia or Yang die, you may need to double check your experience route.
After the battle, continue to the other side of the mountain. Continue downward and then head east to Fabul.
Head to the King's Room and offer to help. (Do not mash the B button during this dialogue.)
If you're able after the Fighters are dead, Parry back to Yang and have him remove the FireClaw to 2L.
Don't bother trying to do any inventory management. It won't be saved.
Walk to the Inn and watch the scenes.
Get the Tent from the chest and go down a floor. Get the 500 GP from the lowest pot and then continue to the exit. After leaving Fabul, head for the ship to the east.
Walk east into Mysidia and go to the item shop on the right.
If you don't have at least 6130 GP at this point, you'll need to reduce your item purchases to make up for it. The Heal is almost certainly not necessary, but it's probably safest to skip a Cure2.
Head to the House of Wishes and talk to the elder. After the scene, head to the weapon and armor shops on the left side of town.
Exit the town and head east to Mt.Ordeals.
Begin climbing the mountain. On the way up, collect the closest Ether1 on the 7th station. Continue to the summit.
Once on the summit, continue until you are even with the final bridge.
From this point on, Palom or Porom should Twin and Cecil and Tellah should use Cure1 on the twins. Cecil may need to Fight toward the end of the fight if the twin spells don't do enough damage.
Walk across the bridge and engage Milon Z.
From here, Tellah and Cecil can either revive or cure the twins or Fight (Cecil) or use Cure2 on Milon Z. (Tellah).
Ideally, you want at least one person to die here, so don't be too eager to revive the twins, especially after they've casted Twin at least once. (If everybody survives, you'll have to play the Dark Elf lottery, unless you want to revert to level 19 Cecil strats at Rubicant. The listed numbers in the guide are going to assume that only Porom dies here, but it doesn't matter exactly who or how many people die, as long as somebody does.)
Try to leave this fight with at least 13 Cure2 remaining (but 15 is better).
After the battle, quickly open the menu.
Enter the tomb and watch the scene.
After the scenes, descend the mountain and head to the chocobo forest. Catch a yellow chocobo and travel back to Mysidia.
Talk to the elder, and then head to Baron via the Serpent Road.
Go to the back of the Inn and talk to Yang.
If necessary, you can do limited inventory management during Karate's first attack.
It's actually possible to trigger the end of battle earlier than that message. There are essentially four different patterns, based on a timer you start right as the battle screen turns black before the fight starts:
The windows to do this correctly are very small, so unfortunately, your success is going to depend on exactly how you start and read the timer. I recommend adjusting your own thresholds up or down if you fail consistently.
After the scenes, leave the Inn. Enter the house to the north, collect the Ether1 from the shelf, and then head to the Baron weapon and armor shop.
Inside the shop, use the secret passage to go behind the counters and collect the two chests for 2000 GP and a Thunder (claw). Afterward, it's time to shop. (Or, to optimize things, you can get the 2000 GP, use the first shop, then collect the other chest and use the other shop.)
After you're done, cast Warp to leave the shop. Enter the Old Water-way, collect the 1000 GP in the secret passage, and continue until just before the Baigan battle on Castle Baron 1F.
Move on to challenge Baigan.
Your priority is to ensure Palom, Porom and Yang are dead by the end of the fight, or you'll need to figure out an experience route backup. (However, if two or more people died at Milon Z., you don't need to kill Yang here.)
Make sure you use Cure2 as necessary to keep Cecil's HP at a reasonable level.
Regarding Cecil and Yang's turns, your goal is to make sure the RightArm is dead, the LeftArm is weakened (to minimize potential Explode damage), and that Baigan himself is weakened so the second Lit-3 will kill him (though this isn't super critical, as Cecil could potentially finish him off).
Head to the throne room to fight Kainazzo.
If this isn't enough, have Cecil and Yang continue using Fight, while Tellah casts Virus. If that still isn't enough, you're going to have to use an Ether1 on Tellah. There's approximately a 7% chance of this happening.
There may not be any inventory management to do here, if you're caught up. Perhaps move the Cloth to the left side for easier selling later, but that's borderline. The best position for the FireClaw is also an open question. It won't be needed again until the Dark Imps battle.
Do not mash X during the scenes, unless you're looking to mercy kill your run. In particular, once you're on the airship, pressing X at the wrong time will cause the game to lock up. Stick to A or B (or some other button) instead.
After the scenes, fly to Mist and enter the town. Head to the weapon shop.
Make your way now to the house at the top of the village, enter the fireplace, and collect the Tiara in the first chest you come across, and the Change (rod) at the end of the secret passage. Have Tellah cast Exit to leave the village (using an Ether if Kainazzo went south).
Next, fly to Toroia and enter the castle. Visit Edward on the left side of the castle and then cast Exit.
Head north to the Chocobo Village, catch a black chocobo, and fly to Cave Magnes.
Head through the cave. On B2F, pick up the Ether1 on the left side of the room. Finally, pick up the Ether2 to the left of the door to the crystal room. Afterward, enter the crystal room.
Talk to the Dark Elf. After the scene, talk to him again.
At this point, you'll need to make a decision based on Cecil's first damage roll. The default pattern is below, and we'll discuss the variations afterward:
If Cecil's first damage roll is 684 or less, Yang should Fight on his second turn instead of Parrying.
If Cecil's first damage roll is 942 or greater, Cid should Fight, Yang should fight on his second turn, and Cecil should Parry on his second turn. (The run buffer after Virus is not necessary in this scenario.)
After the battle, get the crystal and leave the room.
You may wish to heal Cecil, Tellah and Yang here to try to avoid menuing again before FlameDog. If you get back attacked on the way, however, you might have to menu again anyway.
Take the black chocobo back to the Chocobo Village, get a chocobo and return to Toroia.
Talk to the clerics and then cast Exit.
Board your airship and you'll fly to the Tower of Zot.
After Golbez is done taunting you, take the left path to pick up the Fire (armor) and then go up a floor and head to the chest with Fire (sword).
If Yang dies to FlameDog, you'll either have to a) resign yourself to a level 16 Yang at Dr.Lugae or b) revive Yang at Golbez. The level 16 Yang method is probably the simplest.
You may want to cure Cecil, Yang and Tellah if they're weakened, and then continue to the top of the tower.
Stop in the save room, use a Tent, and then move on to engage the Magus Sisters.
TODO: Need to list explicit instructions in case of the early Sandy kill. The gist is to switch to focus on Cindy until she's dead. Just need to map out the turn order.
At this point, there is a reasonable chance that Cindy will be dead. If she's not, finish her off, and you'll have to kill Sandy again (Lit-3 and either Virus or a dagger or two).
Either way, at this point, Yang and Cecil should work on taking themselves out, while Tellah casts Virus on Mindy twice. Make sure he doesn't cast it the second time until Yang and Cecil are dead.
If Tellah needs more MP, he can use Psych on Mindy.
If things go south and you end up killing Sandy more than twice, you should keep Cecil alive. This will cause him to reach level 20 before Rubicant (unless you correct it somehow), but otherwise, Rosa will reach level 20 here, and that will make Valvalis more difficult.
If you're worried about a potential encounter before you enter the next room, you may want to revive and cure Cecil.
Enter the door, watch the scene, talk to Kain and then finally watch the next scene.
Kain should be level 19 at this time. If he (for whatever reason) is only level 18, after the first two jumps, have him alternate between Fight and Jump.
The timing on this fight is very sensitive. Don't hold A to fight unless directed to do so.
At this point, Valvalis transforms into her tornado form. If you still have the Heal, feel free to use it.
If the damage rolls were decent, Kain can Fight on his last turn instead of Jumping. If Valvalis still doesn't die, just continue the normal pattern. She won't have much HP left at this point.
If Cid dies, leave him dead, and the guide will assume you deliberately kill him off. Realistically, you do want at least one person to die. This can be anyone other than Yang, who needs to survive to reach level 17 before Dr.Lugae. Keep in mind that being fully stoned counts as death, but it can be hard to see if a character is fully stoned.
After the scenes, leave the castle and take the airship to Agart.
Use Magma on the well. Afterward, fly to the Underworld.
Enter the castle and talk to the king.
If either of Kain's first two jumps is less than 850 or so, Yang's kicks won't necessarily be enough, so you may want to try having him Fight instead. He's not very consistently helpful in this regard, however. You may end up having to burn a round to have Kain finish off a doll, while Cecil uses a Cure2 on himself. (Never have Cecil Parry in this fight.)
Regardless of how you get there, only do the following once there are two dolls remaining.
If you accidentally trigger the big doll, immediately change rows, have Kain Jump, and have Cecil keep himself healed with Cure2 potions. Of course, you're probably almost out of them, so this may not end well. If you're lucky, you won't trigger the damage range that results in the dolls splitting again. (It's based on damage, not on time.)
In contrast to other categories, the limited number of consumables means that the inventory can more easily get out of sync, even if you follow the instructions. To mitigate that, I'm going to list what I expect the inventory to look like at this point:
| ↓ Top of Inventory ↓ | |
| Dancing | Cure2 |
| (empty) | Life |
| (empty) | Ether1 |
| Change | Ether2 |
| Tiara | (empty) |
| Prisoner | Heal |
| Wind | FireClaw |
| Anything else intended for sale | |
Your path through the Dwarf castle (especially regarding when to walk and when to cast Warp) may vary significantly depending on your step route. Your step route instructions supersede anything written here. In particular, it may ask you to cast Warp on several different maps.
Leave the throne room, and go east to the shop area.
Head into the east tower and pick up Dwarf (axe) on the first floor and the Strength (ring), Elixir, Ether1 and Ether2 on the top floor.
Return to the shop area and go to the armor shop.
Travel through the basement to the other side of the castle and head to the item shop.
Now, go through the passage underneath the Castle to the Dwarf Base. Skip the healing pot, exit to the Underworld, and then make your way to the Tower of Bab-il.
Enter the Tower of Bab-il and make your way to the CatClaw on 3F. Collect the chest and continue on. Get the Ether2 on 7F, and then continue walking until just before Dr.Lugae.
Approach Dr.Lugae to begin the scene.
After Cecil targets Dr.Lugae the second time, you can basically hold A until the fight is over.
At this point, you can just hold A.
After the battle, head to the Super Cannon. Enter the room and prepare to battle.
Watch the scenes, wipe your tears away, and make your way out of the Tower of Bab-il.
After the scene, fly to Baron and land next to the castle. Wait a fraction of a second, and then enter the castle. (If you don't wait, you will instead walk onto the castle tile without entering.)
Head to the right side of the castle and get Cid's lackeys to install the hook on your airship.
Fly north to Mt.Hobs, pick up the hovercraft, fly northwest to Eblan, and finally take the hovercraft west to the cave.
In the first room of the cave, collect the Shuriken and then make your way through until you enter the "town". Enter the weapon and armor shop (second door from the right).
Continue into the Pass to Bab-il. Collect the Ether1 immediately upon entering, and then pass through this room and the next. Pick up the two Elixir chests in the secret passage.
Continue through the cave until you meet up with Edge.
However, unless your step route tells you to remove the Dwarf (axe) here, it's probably better to wait until just before the K.Eblan/Q.Eblan fight. (But be sure to do the change before the fight.)
Pick up the Ether2 in the nearby chest, and then head into the Tower of Bab-il. Pick up the Cure3 on 1F on the way to Edge's parents.
After this, your only task is to wait the battle out.
At this point, Rosa's turn should come up as Rubicant casts Glare, leaving one of your characters dead:
If you get a chance at the end of the fight, have Cecil equip the Dwarf (axe). Take the opportunity to move IceBrand down to 3L. If you aren't able to, I suggest quickly fixing it in the post-battle menu.
This fight is still a work in progress. It's possible some of the patterns won't quite work out as listed.
After the scenes, enter the crystal room and then proceed through the last few rooms of the tower.
Fly to the Castle of Dwarves and land to the left of the castle.
Enter the castle, quickly visit the king to get the Luca (key) and then visit Cid in the infirmary. After the scenes, cast Exit.
Fly to the Land of Monsters. Enter the cave, head to B3F, get the Ninja (sword) in the rightmost of the three chests in the bottom left, and then open the menu.
Fly to the sealed cave and make your way to the first TrapDoor.
The best case is that Cecil is the target. In that case, Rydia can move on to casting Titan. If Rydia is the search target, it's probably better to just bersk Edge, and then revive Rydia later. If Rosa is the target, when her next turn comes around, have her wait and see if Edge is targeted the second time.
Continue through the cave, picking up the Ether1 in the next passage and the Life on B2F, before coming to the next TrapDoor.
Pick up the Ether1 in the next passage, and continue to the final TrapDoor.
Enter the crystal room, take the crystal, leave the crystal room, and then prepare for the upcoming battle.
Make your way back to the entrance, most likely using Warp on most floors, but this may be step route dependent. Once you reach the entrance, open the menu before you try to leave (or even better, take care of it during one of your Warp casts, if you have them).
Fly back to the Castle of Dwarves and go to the throne room. After the scene, cast Exit and fly to the Overworld.
Fly to Mysidia, land directly to the left of the town and watch the scene.
You step route may ask you to either walk or fly to the Big Whale. It seems silly to fly two tiles, but it can potentially save time.
Board the Big Whale and fly to the moon.
Fly to the Lunar Path and follow the path to the Lunar's Lair. After entering and recruiting FuSoYa, make the trek back to your airship and fly to Earth.
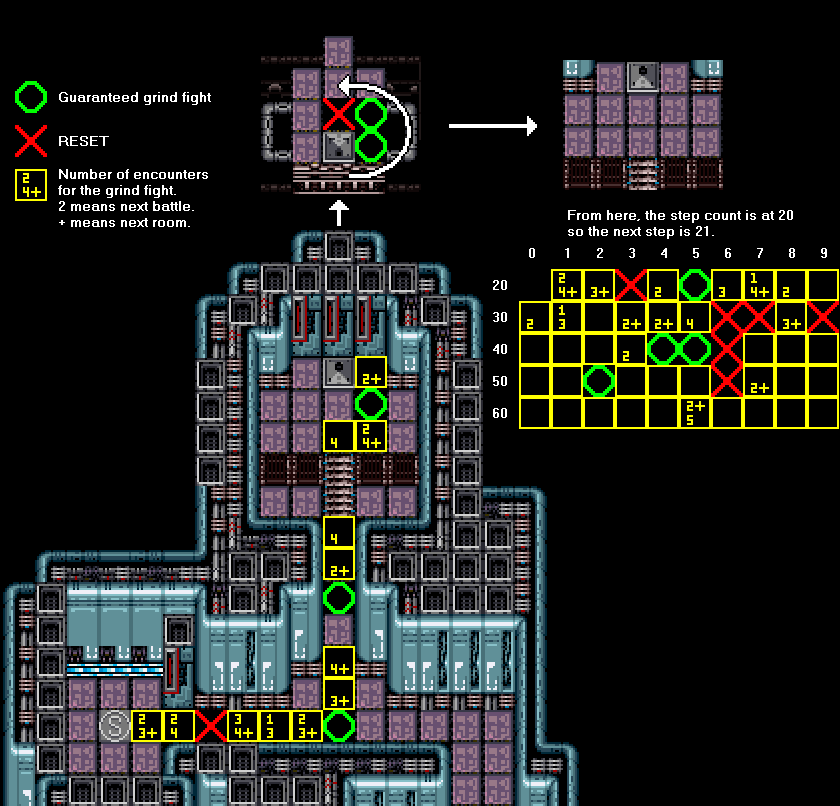
After watching the scenes, make your way through the Giant of Bab-il until you reach the Passage, picking up the Ether1 in the close chest on the right side of the Chest along the way. You generally want to wait until immediately before the grind fight before you do this menu. If you're on a step route, this is easy. If not, you may want to menu immediately just in case you run into the grind fight on the way. However, back attacks from certain enemies will be more annoying in that case.
Next, move along until you find the grind fight. Use either a step route or this manipulation (image version) to find it.
This fight is somewhat complicated, so instead of a detailed command sequence, we'll instead look at the three phases of the fight. The first phase depends on exactly what type of battle you get:
If Edge is in the front row (in other words, in any case except a back attack), you might wish to have eithe Rydia, Rosa or Cecil use Change on their first turn. This will minimize the chance of killing the searcher early.
If you have a chance during a Beam attack, you should do some minor inventory management. If following my inventory management route, I recommend swapping TODO.
The following will need to repeat for seventeen cycles (note that Edge does not get a turn for the first cycle):
This fight has very difficult timing, and things may go wrong. The most obvious failure is Rydia going before FuSoYa casts Weak. You can prevent this by delaying Rydia's Fight if the Searcher's text box pops up during her turn, but the exact timing of this is difficult to describe in text. Rivers McCown suggests no longer holding A on Rydia's turn after the second cycle. If Rydia does end up going before Weak, the character after FuSoYa should hold A the rest of the fight.
The battle speed 2 version of this fight appears to be 100% consistent, so using that is highly recommended.
A detailed strategy for recovery if things go wrong is beyond the scope of this guide.
Ultimately, you need to kill 17 dragons. While casting Weak, if you note that FuSoYa has less than 50 MP, ensure you restore some MP. After approximately six dragons, you should use an Elixir on the Searcher to ensure it doesn't die.
When Rydia's turn comes up to kill the seventeenth dragon, wait on her turn while the dragon uses Fire twice. At this point, kill the dragon.
After you have killed the requisite number of dragons, complete the following tasks:
If Cecil doesn't switch back to the Dwarf (axe) before fighting Edge, he's technically taking advantage of the back row glitch, so depending on the rules you're going by, that may be a problem.
The only reason you'd change rows is to move Rosa to the front so you don't accidentally take advantage of the back row glitch.
Make sure you don't end the fight until only Rosa is alive. It may take an extra round for Cecil to kill himself.
There are a few random formations that Rosa may not be able to run from, so Edge is revived to help with those if necessary.
Continue on to the Elements battle.
At this point, Edge should continue using Fight. Rosa will most likely need to use Cure4 every turn to keep up with Rubicant's damage. FuSoYa should cast Ice-3.
Once the boss turns to Kainazzo, Edge should equip the Thunder (claw), Rosa should cast Bersk on Edge and keep herself and Edge blinked, and FuSoYa should cast Lit-3.
After the change to Valvalis, Rosa can switch to casting White.
If Cecil is level 22 going into this fight, you need to make a couple of changes. On Rosa's second turn, she should wait about one second, then cast White (a little earlier than normal). After the White cast, you'll need to pause buffer and run buffer FuSoYa's turn to cast Nuke, also run buffering out of the cast. If you're lucky, it works.
After the scenes, board the Big Whale.
Enter the crystal room, and begin your descent into the Lunar Core. Along the way, you want to collect the chest with White (robe) in one of the rooms on B5. It's the lone chest in a room shaped like an upside down U.
You'll need to pick up two of the Ninja stars available along the way. If you're using a step route, it will tell you which ones. Otherwise, pick whichever you prefer. In general, the fastest two are on Lunar Core B1 and Lunar Core B3. In addition, there is an Elixir you may want on Lunar Core B2.
TODO: Continue the descent until you reach the final battle. If you run into any formations of Red D. x1, it's probably faster to have Kain parry and for Rosa to cast Exit. The battle itself will take longer, but you'll escape the Heat Ray, which might make healing less necessary.
Approach Zemus to begin the final cutscenes.
Zeromus transforms.
Zeromus shakes.
Zeromus casts Big Bang and shakes.
Zeromus casts Big Bang.
Repeat this cycle until Zeromus is finished. You may need to have Rosa restore her MP at some point, or to separately heal after a Virus or Nuke.