Step Routing Basics
Jason Lynch <jason@aexoden.com> (Aexoden)Introduction
Step routing in Final Fantasy IV is a tool that allows us to minimize the total duration of a speedrun in several ways:
- Minimizing the total number of random encounters.
- Ensuring the encounters we do get are the most desirable.
- Ensuring a guaranteed grind fight along the way, if applicable.
This page will attempt to detail many of the nuances you will need to understand if you wish to use any of the available routes.
Getting Started
Before we go into any details, it's important to discuss some basic concepts you should understand:
- Not every step matters. Most tiles in towns and several random tiles throughout the dungeons don't actually affect the step counter. Knowing where and when steps do count is key to completing a successful run.
- There is such thing as a free step. In several places throughout the game, there are multiple paths you can take from A to B, and while these paths are equally long tile-wise, they may increase your step counter by different numbers. The routes use this fact extensively, and this page will attempt to make you aware of all the locations. For historical reasons, these are referred to as optional steps.
- A single mistaken step can be disasterous. A single extra step may seem innocuous, but if it causes you to get an extra encounter or to miss an expected encounter, the encounters you get for the rest of the run may change significantly. This includes losing the guaranteed grind fight, running into unexpected dangerous encounters, or simply getting a less favorable descent in the final dungeon.
The route detail pages for the mainstream routes provide detailed tutorials to help you learn exactly how to walk, and where you might take extra steps. With few exceptions, you can actually take these steps anywhere on the appropriate map, so long as you take the correct number of steps. However, you need to be mindful of tiles that do not count, as these are sometimes used to add a single extra step. Those can obviously not be moved around arbitrarily. I recommend using these tutorial pages once or twice until you are familiar with most of the available maps.
On most maps, the extent of the step route is going to be to take some number of extra steps. This guide will detail the locations where things are more complicated, but it won't go into detail about every possible map. If you have any questions, please contact me on Discord or via e-mail.
Knowing Your Seed
One of the most annoying parts of using a step route is determining your seed. This process begins after you reset after the Mist Clip. The currently recommended way to identify your seed is to use the Seed Finder, which provides a point-and-click interface.
Step Route Details
This next section goes into detail about some of the more complicated maps during a step route. What it doesn't cover, however, is perfect walking on every map. It also does not cover every location where it may be possible to take a single extra step. The individual route tutorials will help with that. If you have trouble with anything, please contact me.
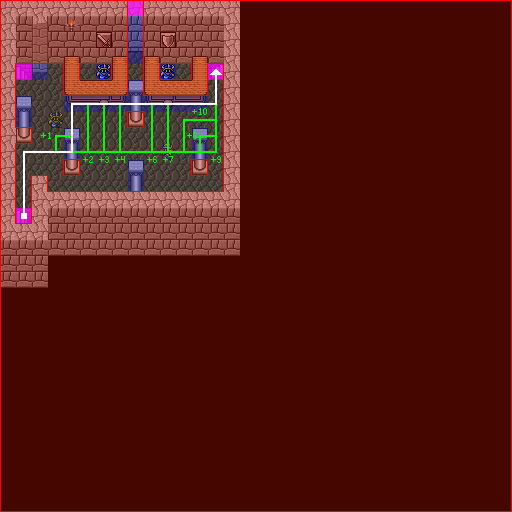
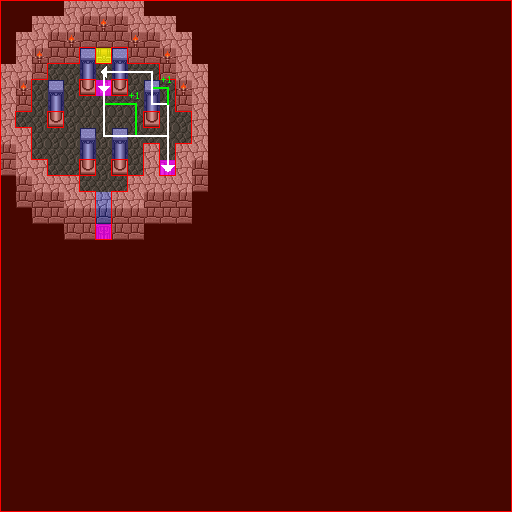
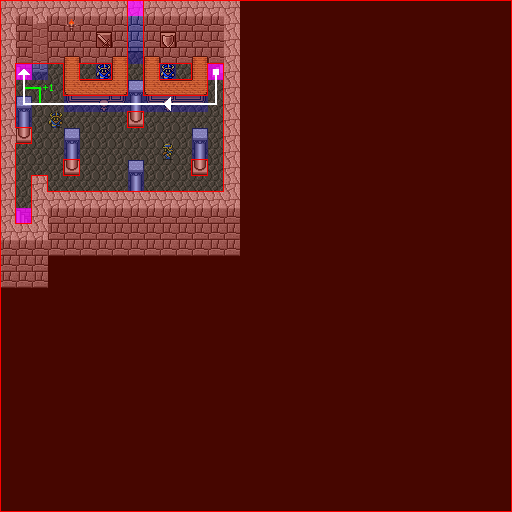
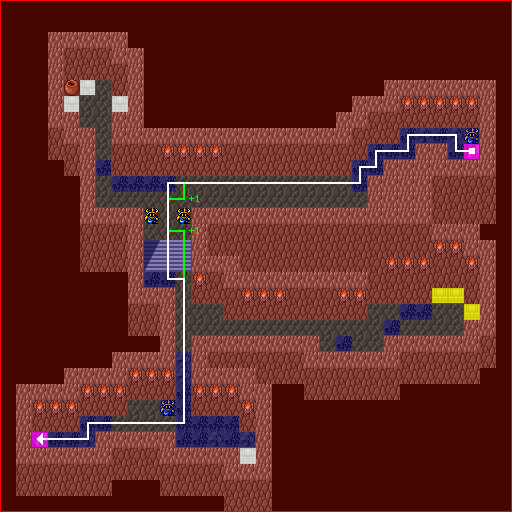
The following maps are simplified versions of the maps used in the route-specific tutorials, to help cover the major points. Here are some notes about the maps:
- Blue and cyan tiles do not increase your step count. Avoid taking extra steps on these tiles unless you only want a single extra step.
- White paths are the default paths that add no extra steps, while green and yellow paths offer additional steps.
- Solid boxes mean starting locations for walks. Open boxes mean you will turn around after you reach that location.
- The short one-tile paths offering +1 or +2 steps are only suggestions. As long as you take the steps anywhere within the current visit to the map, it's fine. (Some steps must additionally be taken during a certain part of the map. For instance, before or after a change in party members. The route tries to clarify this as much as possible.)
Pesky Odd Steps
If you are asked to take an odd number of steps on a map that isn't detailed on this page, please refer to the route-specific tutorials. Those maps indicate which steps count and which don't, which will allow you to put together a plan on where to take your steps.
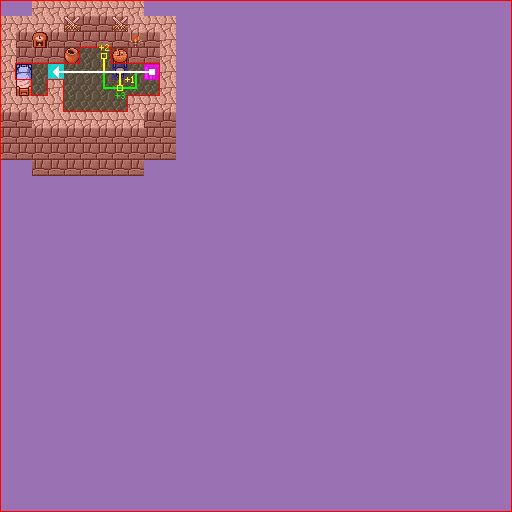
Castle Baron (introduction)
There's nothing particularly interesting about this map, but it's included here because it's an essential part of seed 92 manipulation, and it is not included in the route-specific tutorials.
Essentially, you need to take at least one extra step. This is most commonly done by stepping off the stool and then stepping back onto it. The stool itself does not count, so this results in one extra step. Realistically, you actually have several extra steps you could take before things go awry, so the stool thing is mostly about swag. If you're on seed 92, just make sure you take at least one extra step before you leave the castle.
If by some chance, you're playing around with single segment routes, you might actually have to take a significant number of steps here. You can take three extra steps by walking under the stool, instead.
Watery Pass-South Save Room
Again, this map is pretty mundane. However, it is notable in that there are several pairs of seeds, known as twin seeds, that cannot be distinguished by the time you reach this map. If you are using the seed finder tool, appropriate instructions will be given to you to resolve the situation. If not, your best bet is to pick one of them, and follow that route closely using the detail tab. If you run into any differences, switch to the other one.

Damcyan
Damcyan is the first instance of those optional steps we talked about earlier. On Damcyan 2F, you can take either the default left path, or the right path which adds an extra step. You can then take the extra even number of steps on either floor, but make sure to not take extra steps on a cracked tile or behind pillars, as those don't count toward your step count.


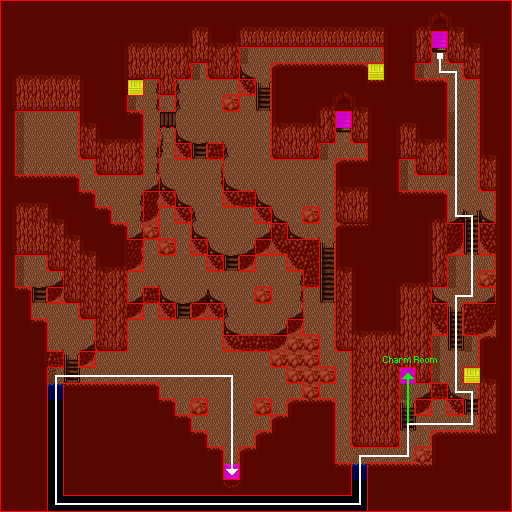
Antlion B2F
Both on the way in and on the way out, you may be asked to enter the Charm Room in the Antlion cave (so named because it contains a chest holding Edward's Charm harp). Once inside, take the requisite number of extra steps, and then immediately leave.
This room is the first example of several side rooms you may need to enter throughout the run. The others won't be detailed, so watch out for them. They are notable because they have either a reduced or zero encounter rate, yet steps still count, helping us to skip encounters.
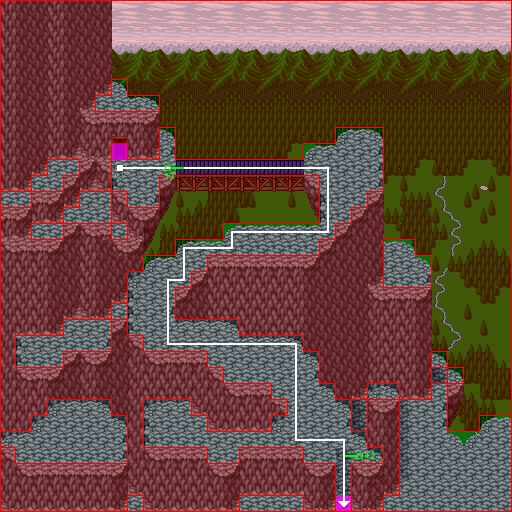
Mt.Hobs-East
This is a good example of a map where you can take single extra steps by using tiles that don't count as steps. In this case, the bridge doesn't count, so you can take a single extra step by stepping off the bridge and then back on. This technique may need to be used several times throughout the run.
Fabul
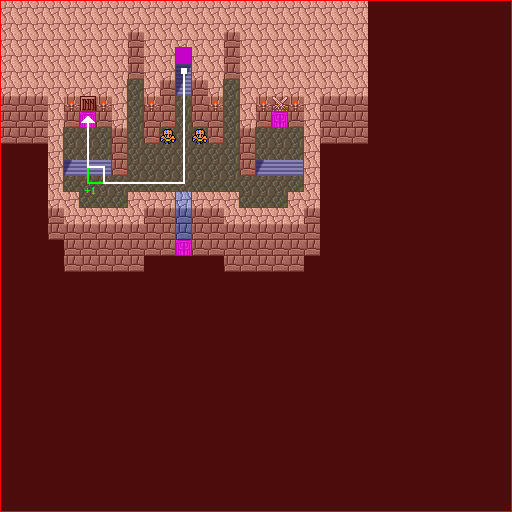
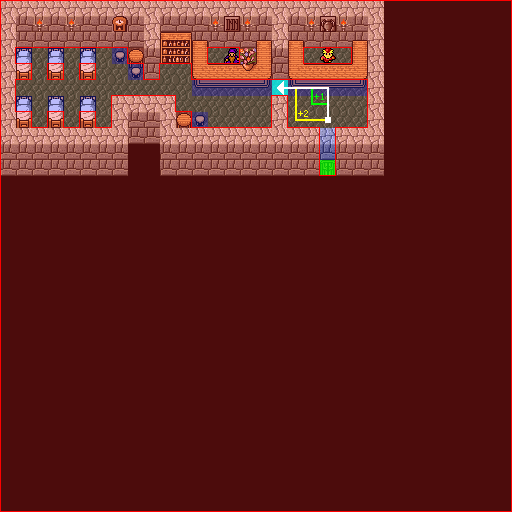
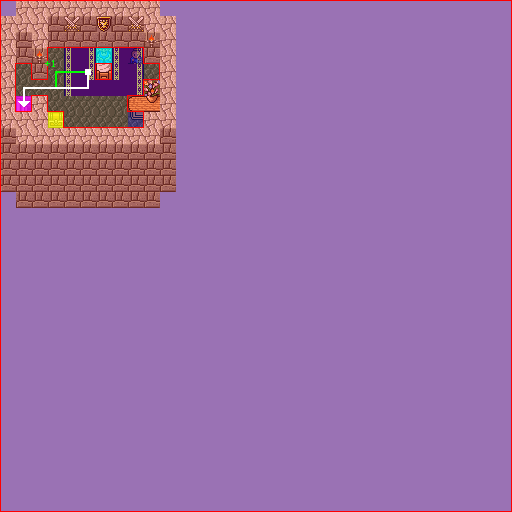
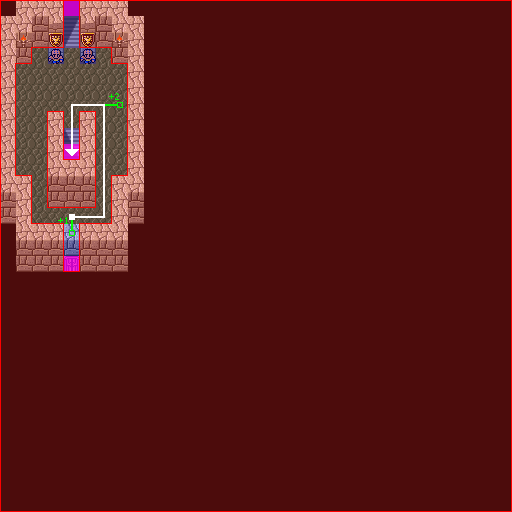
There is a total of 10 optional steps available in Fabul (16 in the SFC route). If you need an odd number of steps, I recommend taking an odd number of optional steps and making up the difference with pairs of extra steps. That said, there are numerous tiles that can be used for single extra steps if necessary.
Overworld (Mysidia)
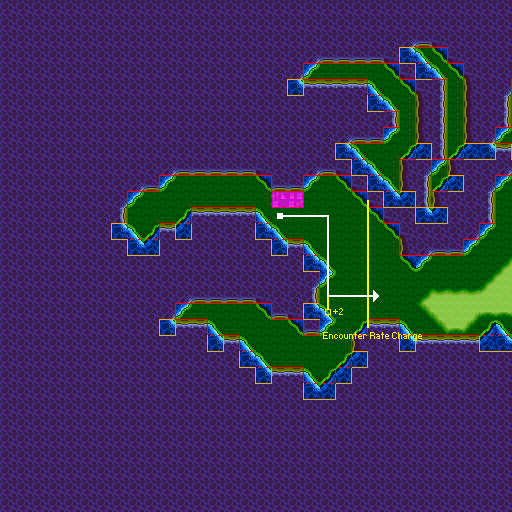
A few steps east of Mysidia, the encounter rate changes from 8/256 to 10/256, so it may be beneficial to take extra steps before it changes. Ensure that you walk down as far as indicated in the image before you start heading east.
Mt.Ordeals Summit
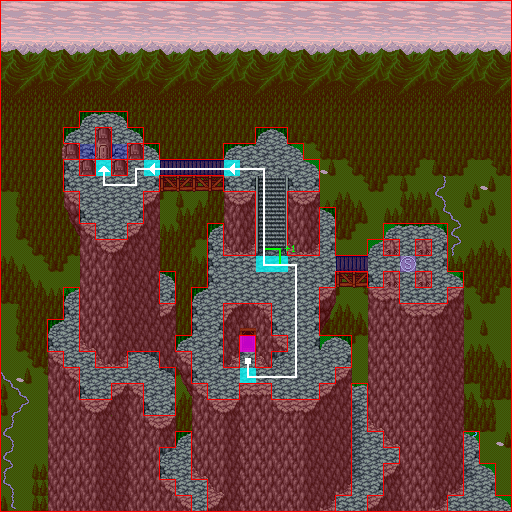
At the top of Mt.Ordeals, there are two trigger tiles (which don't count as steps) in front of the stairs leading up to the Milon battles. By walking on either only one or both of these tiles, you can potentially take an optional step. Since we pass this area twice, there are two optional steps available.
Toroian Castle [before Cave Magnes]
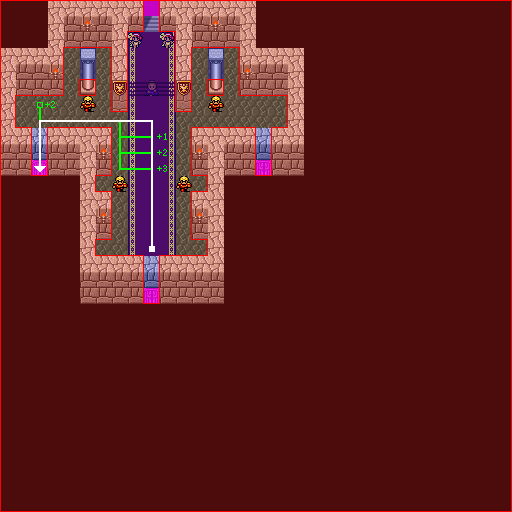
On your way to visit Edward, you can take up to three optional steps, depending on exactly where you turn left. Additional extra steps can then be taken near the doorway. (On the other hand, if you're using the frog-based black chocobo manipulation, you'll need to take any remaining steps in the infirmary where Edward is.)
Overworld (Toroia) [before Cave Magnes]
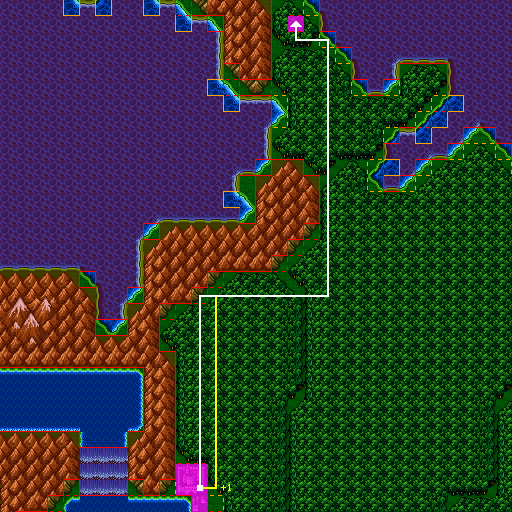
When leaving the castle, instead of heading directly north, you can head east, which will give you one extra step.
Toroian Castle [after Cave Magnes]
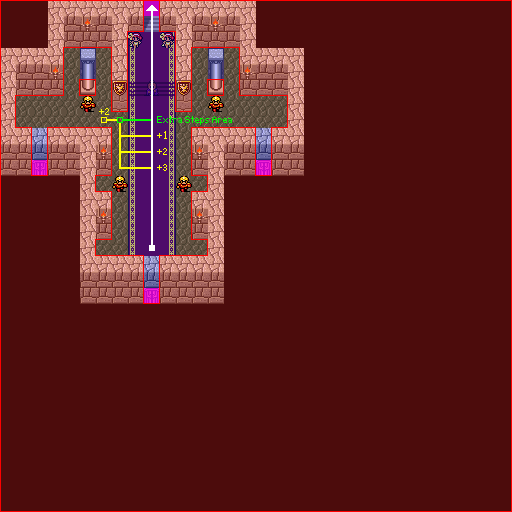
You may be asked to enter the Extra Steps Area, which refers to the non-carpet tiles on the left or right side of the screen. Once in this area, you will need to take any requested number of extra steps.
A long time ago, Myself086's routes simply listed this section as a number of steps. The implicit step from entering the step area was included in the given number. This implicit step is no longer included in the modern routes. To help keep things clear, both totals are listed in the route summary.
Pretend the Extra Steps Area is a separate room and treat it the same as you would treat any other separate room.
Overworld (Toroia) [before Tower of Zot]
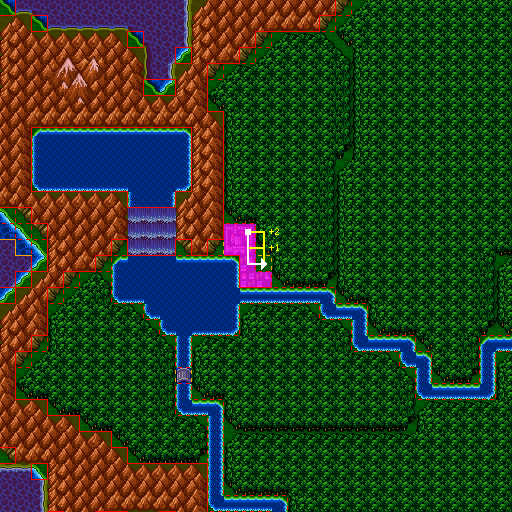
When leaving Toroia for the Tower of Zot, you can take up to two optional steps depending on which direction you go.
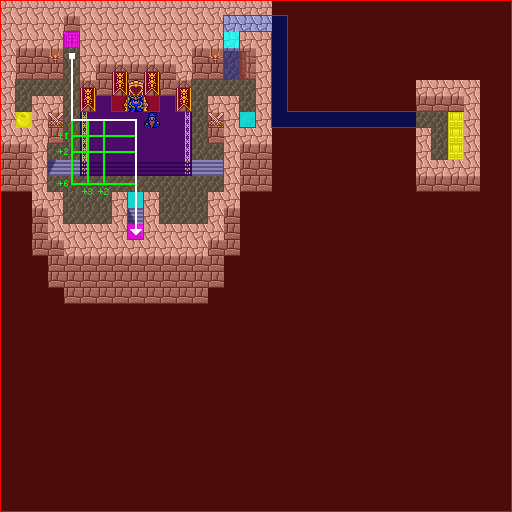
Castle of Dwarves
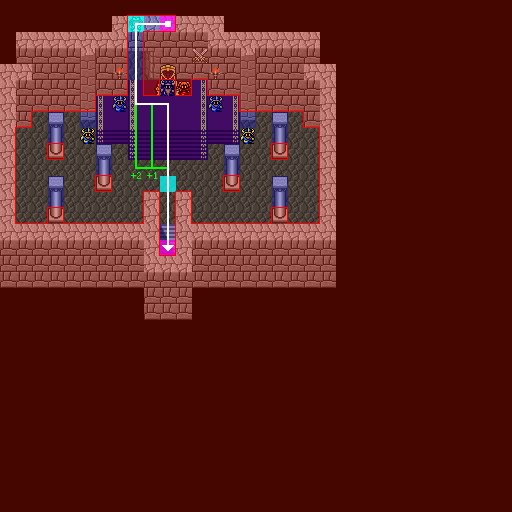
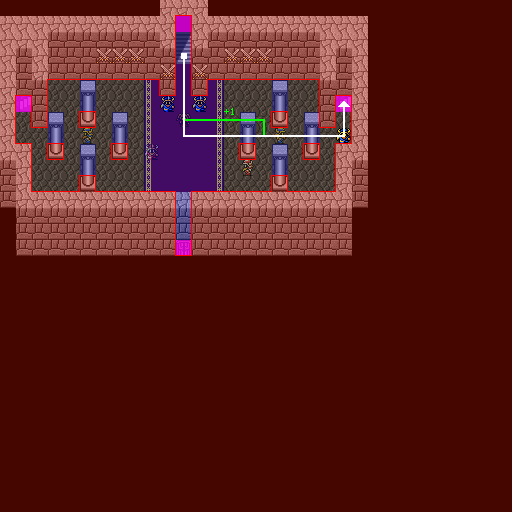
Welcome to the nightmare. With a total of either 21 or 22 optional steps (depending on route) scattered among seven rooms, and up to four potential extra Warp casts, the Castle of Dwarves is the nemesis of any FF4 speedrunner. Your first step should probably be to learn the default paths, as they aren't necessarily how one would walk normally.
As hinted above, there may be up to four extra Warp casts. The summary or detail tabs of the route will only specify the number of extra warps. If you need more assitance, the tutorial maps will tell you exactly which maps on which to cast Warp. There is an assumed priority order, which you must follow (in other words, do the first X number of Warp casts from the below list, depending on what the route specifies):
- The room where you picked up the Dwarf axe, on the way down.
- The King's room (the throne room), after returning from the crystal room.
- The top floor of the right tower, after picking up the Strength ring (Edge+Excalbur routes only).
- The floor after the top floor of the right tower (on the way down, where you walk two steps from staircase to staircase).
The maps shown here are slightly outdated, and do not show the two most recent optional step additions. Refer to the tutorial maps for more assitance, but the two new steps are as follows:
- In the Dwarf axe room, on the way up, if you walk in between the two pillars, you can take two extra steps.
- For Rosa routes only, on your way to get the elixir on the top floor, if you step onto the tile next to the staircase, you can take one additional step.
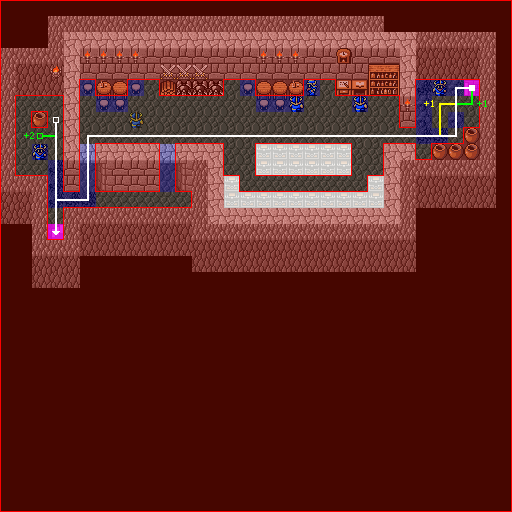
Cave Eblana B2F
In the Weapon/Armor shop in Cave Eblana B2F, there are two optional steps available, as tiles up against the shop counter don't count as steps.
You may also be asked to cast Warp to leave this room.
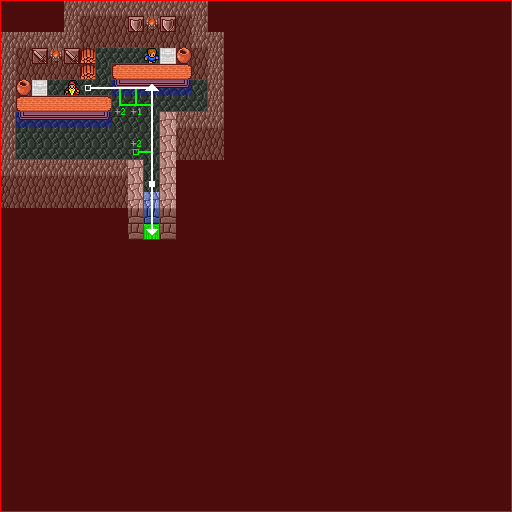
Castle of Dwarves [after Tower of Bab-il]
When you go to visit Cid in the infirmary, there are four potential optional steps you could take. Technically, there are other paths through the pillars you could take to get the same number of steps, but these seem to be the simplest.
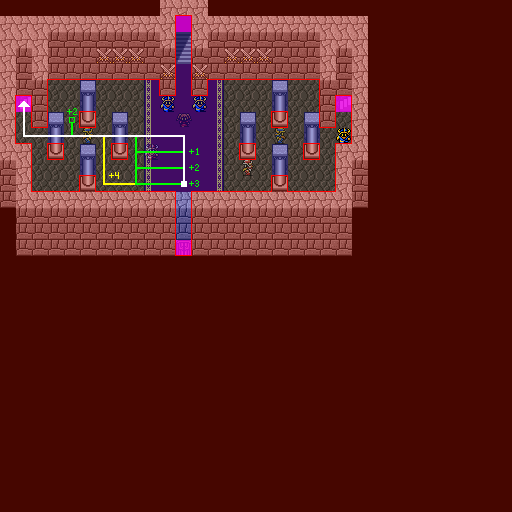
Land of Monsters B3F
If you're running the Edge+Excalbur route, on the third floor of the Land of Monsters, there are three paths you might be asked to take. The default path is the obvious walk directly to the exit. There is also a secret passage with two useful exits you might be asked to use, as demonstrated in the image. For whatever reason, tiles within the secret passage don't count as steps.
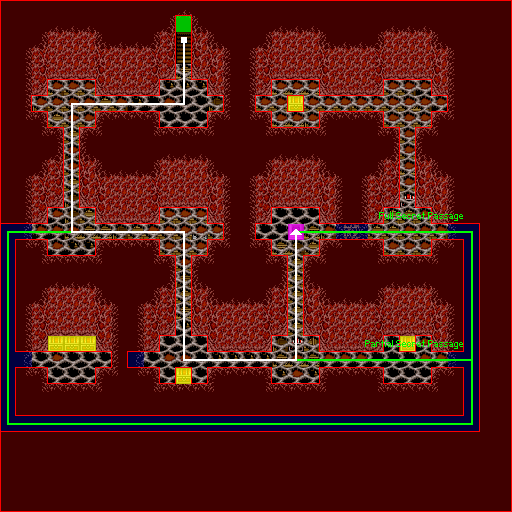
Hummingway Cave
Again, only on the Edge+Excalbur route, you will be visiting the Hummingway Cave. You may be asked to visit the cave either before or after you recruit FuSoYa. Just don't forget your elixirs if you recruit FuSoYa first.
Second, in the Hummingway Cave, you may be asked to take extra steps. The cave currently has a 16 step minimum, to allow you enough steps to track down the correct NPC, who is highlighted in red, and purchase the Elixirs. (My testing indicates that if you take your steps slowly, you can often do the entire cave in 8-12 steps, but we're sticking with 16 as a safe number.)
Any extra steps indicated in the route are in addition to this minimum of 16. The route summary will also list the total steps needed to keep things simple.
If you mess up and are unable to exit the cave without taking too many steps, you can simply cast Exit once you reach the correct number of steps. This gives you slightly more leeway in case you have trouble catching the shop NPC.
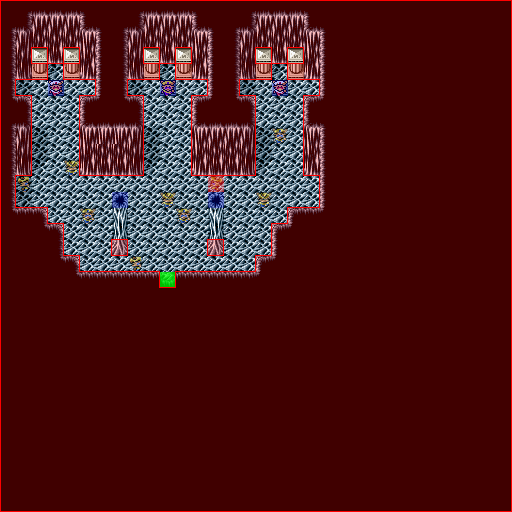
Giant of Bab-il Mouth
In the Giant of Bab-il Mouth, you can take one optional step depending on if you take your step to the left or right on the stairs or not. The stairs don't count as steps.
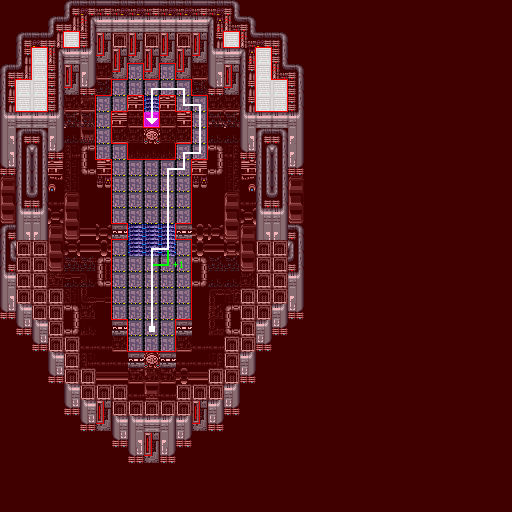
Grind Fight
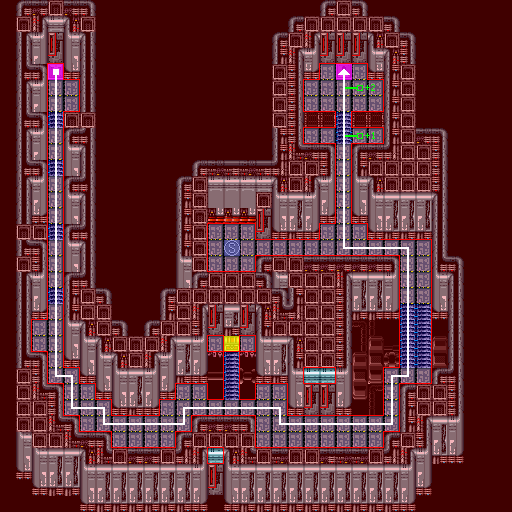
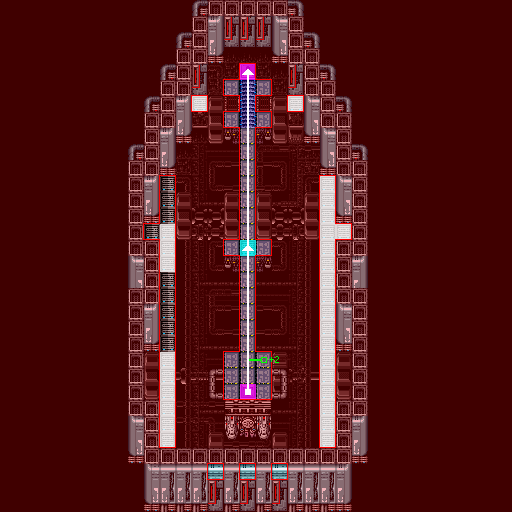
On the two floors where you might encounter the grind fight, you may be asked to take extra steps. You can take these steps anywhere, but be careful to keep in mind that stair tiles do not count as steps. Some suggested locations for taking these steps are depicted in the images.
Any extra steps required to find the grind fight will be listed. If you are not being asked to take extra steps, you can head directly toward the Elements battle confident that you will encounter the grind fight along the way in the listed room (assuming you're on step route).
The route summary also lists all battles in these two rooms so you can easily determine if you have encountered a fake grind fight or not.
Conclusion
With any luck, this will help you navigate the step routes on this site. If you have any questions, comments or suggestions, please send me an e-mail or contact me on Discord. I'm especially interested if you have trouble with a particular map and think it's a good candidate to add to this guide.